| This article is about general info about building things. For the list of all structures, see Structures. |
This article could contain outdated information that is inaccurate for the current version (1.52) of the game. It was last updated for 0.49.
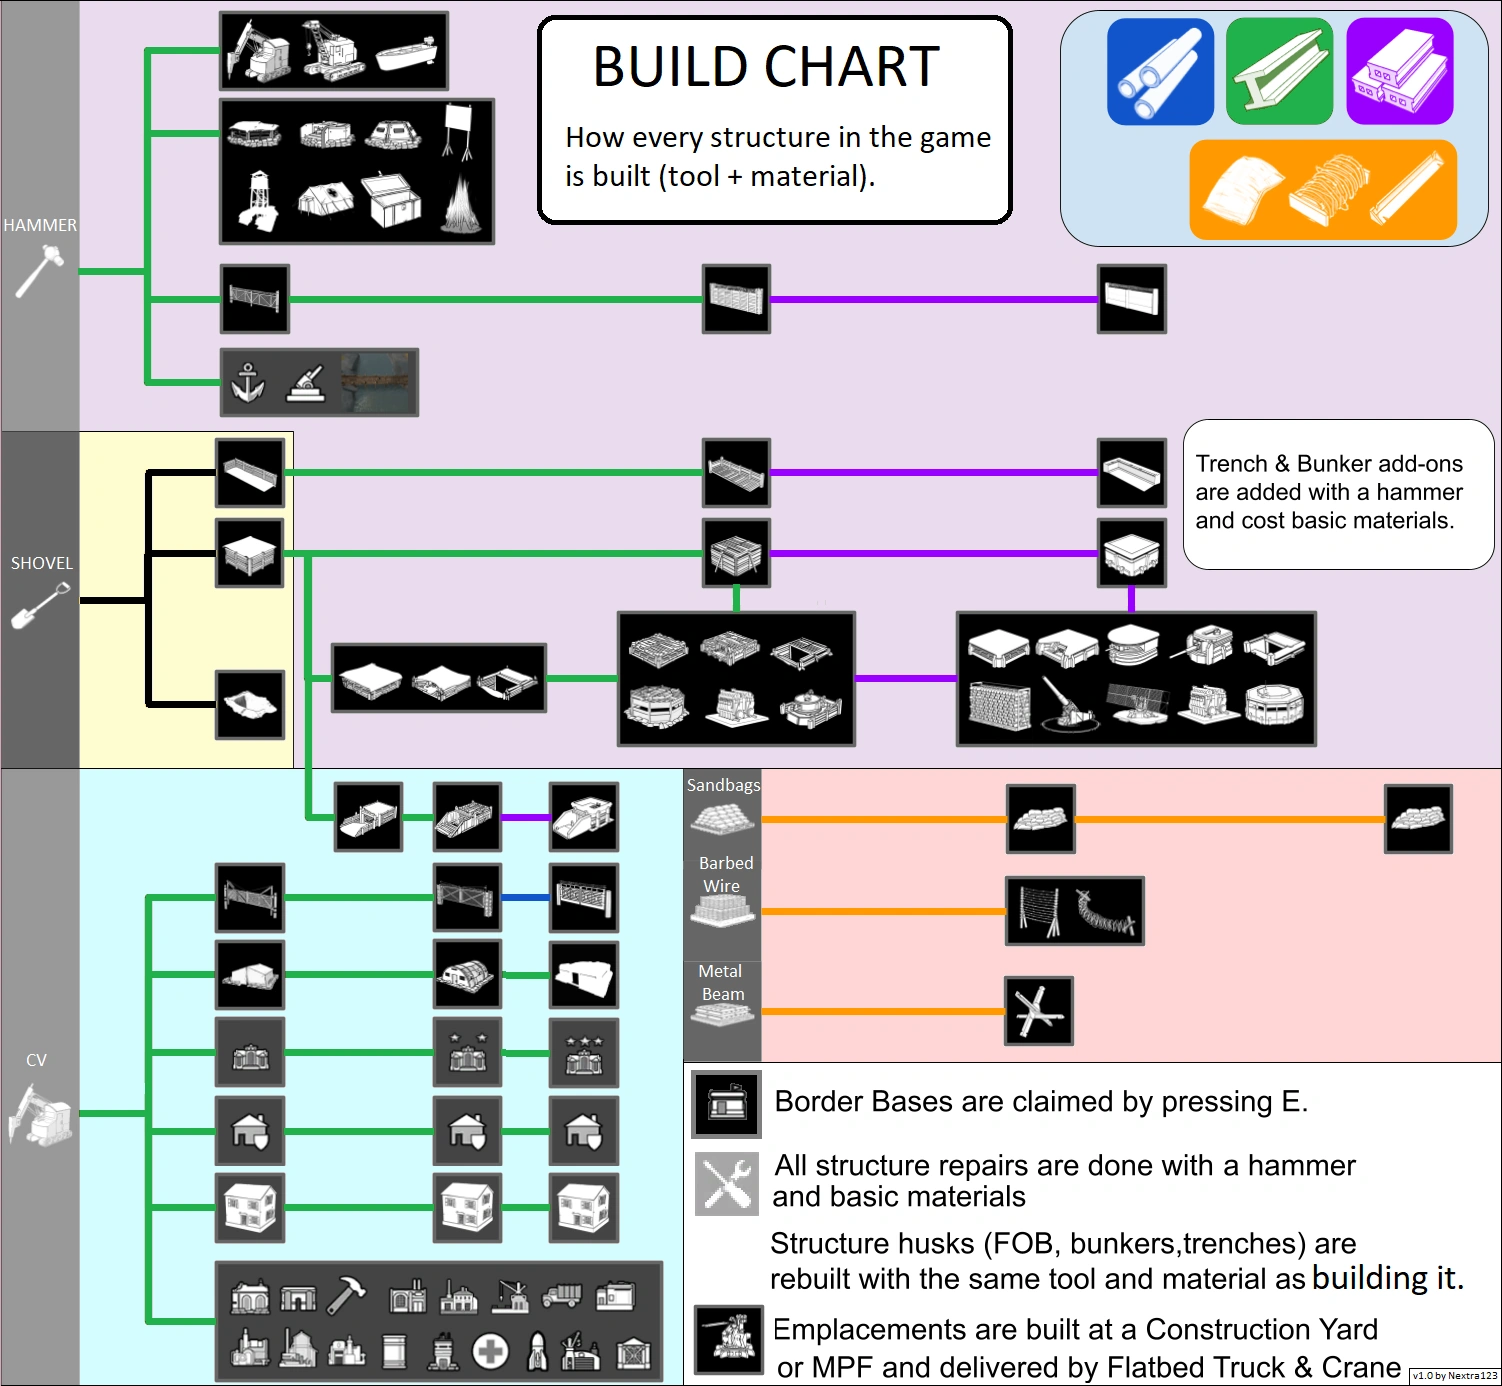
How To Build[ | ]
Foxhole lets you build, rebuild, and upgrade a large variety of structures. These tasks are done with various tools, let's explain them:
Shovel  [ | ]
[ | ]
The Shovel is used exclusively to build trenches, simple bunkers, and Foxholes. Shovel can be produced at Factories.
To build with a shovel:
- Equip shovel
- Press
B - Select option with
Left Click - Rotate blueprint with
Right Click+Drag, holdShiftif you don't want it to auto-connect to nearby trenches or bunkers, and place it withLeft Click - Hit blueprint with shovel by holding
Left Clickuntil completion.
Hammer  [ | ]
[ | ]
The Hammer builds and upgrades structures, consuming a required amount of Basic Materials or Refined Materials depending on the structure. Notably, it handles most upgrades and add-ons for trenches and bunkers. It's the tool to build vehicles. It's also used to rebuild Bridges, Shipyards and Coastal Guns.
To build:
- Equip hammer
- Have the required amount of materials in backpack (depends on structure type)
- Press
B - Select option with
Left Click - Rotate blueprint with
Right Click+Dragand place it with Left Click. (some options may have position requirements) - Hit blueprint with hammer by holding
Left Clickuntil completion.
To rebuild:
- Equip hammer
- Have the required amount of materials in backpack (depends on structure type)
- Get close to the destroyed structure.
- Press
E - Hit blueprint with hammer by holding
Left Clickuntil completion.
To upgrade:
- Equip hammer
- Press
Fto switch hammer to "Upgrade Mode" - Have the required amount of materials in backpack (depends on the upgrade)
- Get close to the structure and make sure it's at full health.
- Press
E - If multiple upgrade options: Rotate upgrade with
Mouse Scroll Wheeland Select option. - If required, Hit blueprint with hammer by holding
Left Clickuntil completion.
Construction Vehicle (CV) [ | ]
The Construction Vehicle (CV) builds, rebuilds and upgrades large buildings, consuming a required amount of materials. Notably it is the tool to build, rebuild, and upgrade all types of Bases. It also builds Gates. CVs are built with a hammer and 100 Basic Materials next to a World Base (Town Base, Relic Base, Border Base).
To build:
- Drive to location
- Have the required amount of materials in CV inventory (depends on building type)
- press
B - Select option with
Left Click - Rotate blueprint with
Right Click+Dragand place it withLeft Click - Hit blueprint with CV arm by aiming with
Right Clickand holdingLeft Clickuntil completion
To rebuild:
- Drive close to destroyed building
- Have the required amount of materials in CV inventory (depends on building type)
- Press
E - Hit blueprint with CV arm by aiming with
Right Clickand holdingLeft Clickuntil completion.
To upgrade:
- Drive close to building
- Have the required amount of materials in CV inventory (depends on the upgrade)
- Make sure the building is at full health.
- Press
Fto switch to "upgrade mode" - Press
E - Hit blueprint with CV arm by aiming with
Right Clickand holdingLeft Clickuntil completion.
Large Materials [ | ]
Large Materials are large items carried on the shoulder that are used as both building tools and building materials. They are produced in Pallets at a Construction Yard. They are used to build and upgrade dynamic structures where the player chooses the shape. Sandbags are used to build sandbags covers, which can then be upgraded into sandbags walls for example.
To build:
- Equip the Large Material
- Press
B - Select option with
Left Click - Rotate blueprint with
Right Click+Dragand place the first end of the blueprint withLeft Click. - Use
Right Click+Dragto curve the blueprint, pressLeft Clickto place the other end of the blueprint. - Submit your Large Material to the blueprint with
Left Clickand bring more of the same type until completion.
To upgrade:
- Equip the Large Material (same type that was used to build the structure)
- Press
Fto switch to "Upgrade Mode" - Get close and aim at the structure and make sure it's at full health.
- Press
E - Submit your Large Material to the blueprint with
Left Clickand bring more of the same type until completion.
Construction Facilities[ | ]
Garage, Shipyard, and Construction Yard are facilities where vehicles, ships, and shippables are built. Press E to open their menu, select a thing to build, then use your hammer (with the required materials in your inventory).
Repairing[ | ]
Repairing structures, buildings, and vehicles is done by hitting the damaged thing with your hammer and consumes Basic Materials.
Tips[ | ]
- You cannot build within 60m from any region border, unless you're in the 40m radius of a Border Base.
- Structures built between 60m and 150m from a region border suffer from fast Decay (See next section).
- Up to 3 people can work on a blueprint's construction at the same time; there is no such limit for repairing.
- The hammer's upgrade mode displays statistics for the targeted structure, such as Health, Faction, and the original builder of the structure.
- Blueprints are easily destroyed and any materials invested in the construction is lost.
- If an upgrade blueprint is shot, it will turn back into the original structure
- There's no time limit to finish building a blueprint.
- Make sure your foxholes and gun turrets have a clear line of sights when building them.
- You cannot build within 25m of an enemy World Base.
- You can only place a blueprint once every 10 seconds (to avoid spam).
Structure Decay[ | ]
After a structure has been built, it will slowly start to decay (lose hit points) after a Grace period. To prevent decay, the structure must be within AI range of a base with Small or Large Garrison upgrade and stockpiled with Garrison Supplies (bunker structures can alternatively use Bunker Supplies) . You can check the hp% of a structure with your hammer equipped and standing close to it. Decay only affects structures placed by players and not static structures that players simply rebuild.
Notes:
- Decay within 150m from a border is not preventable and happens faster.
- Decay does not start immediately, the grace period lasts a few hours for fast decay and one day for normal decay.
- Repairing a decayed structure partially restart the grace period, proportionally to how much health you repaired.
How to Build a Bunker Base[ | ]
General Building Strategies[ | ]
Road Intel Coverage:
It is extremely important that all main roads, especially those used to transport supplies to the front, be covered by Watch Tower. Any gap in the intel cover can mean a partisan roadblock attacking your supply line. Even around towns or near front line, Watch Tower coverage is a must to have accurate information about the enemy's movement. Building new Watch Towers in areas without coverage always a good thing.
Building to advance the front:
All front lines need basic materials. When your team pushes back the enemy, you need to quickly build defenses with basic materials in the newly captured terrain so your allies aren't forced to fight on open ground when the enemy inevitably pushes you back.
Securing Resource Fields and Mines:
Resources Fields and Mines are a prime target of enemy partisans. Make sure there are active defenses at most fields and mine, by building a Forward Base with pillboxes around it.
Rebuilding a captured town:
Once you've destroyed and rebuilt an enemy town hall, the work isn't over. You must build active defenses around the town base, like any other front line. Once the "Fortifications" Base Upgrade is unlocked, you can build a CV and rebuild the Safe Houses and all Garrisoned Houses in town (they must first be destroyed if built by the enemy). Those houses are much more resilient than pillboxes, have AI to fire at enemies, gives you great defensive positions to shoot from, and they do not suffer from decay. Once the "Small Garrison" upgrade is complete for the town, you can upgrade the Town Base to Tier 2 as well as the Safe Houses and all the Garrisoned Houses using a CV. This greatly increases the town's defensive advantage. Finally, when the town fills the "Large Garrison" upgrade, you can upgrade the town base and houses to tier 3.
Building a bunker base:
Bunker bases are superior to Forward Base because the Garrison Bunker they can have are far stronger than simple foxholes. Their defensive power increases when the base and its garrison bunkers are upgraded to concrete. The price of this superiority is lengthier construction time and necessary planning. Consider building bunker bases in advance far from the front line at choke points in your territory (such as bridges) that are far away from any town defenses, to prevent enemy partisans from entering your back lines and to provide a strong fall back position should your team be pushed back.