This article could contain outdated information that is inaccurate for the current version (1.52) of the game. It was last updated for 0.49.
| This article is about the full guide to Logistics. For quickstart guide to logistics, see Community Guides/Logistics Quickstart. |
In Foxhole, the generation, transportation and co-ordination of supplies is the key to winning the war. The logistics role handles all of these duties and more. Having a well supplied front line with a wide variety of guns, explosives and vehicles to use will give a massive advantage over a lesser stocked enemy. This guide aims to help players understand every aspect of logistics.
Overview[ | ]
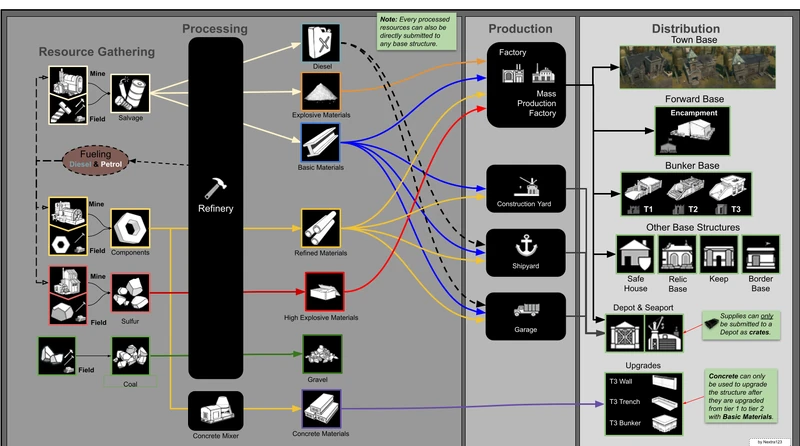
Logistics include 4 things:
- Gathering Raw Resources


 at Resource Fields or Resource Mines
 - Refining those Raw Resources into Materials at a Refinery
- Producing using materials
- crates of supplies (weapons, ammo, etc...) in Factories
- vehicles in Garages
- ships in Shipyards
- shippable structures in Construction Yards
- crates of all of the above in a Mass Production Factory
- crates of supplies
- Delivering supplies either to the frontline Bases or storing them in Storage Depots or Seaports

Gathering Raw Resources[ | ]
Resource Fields [ | ]
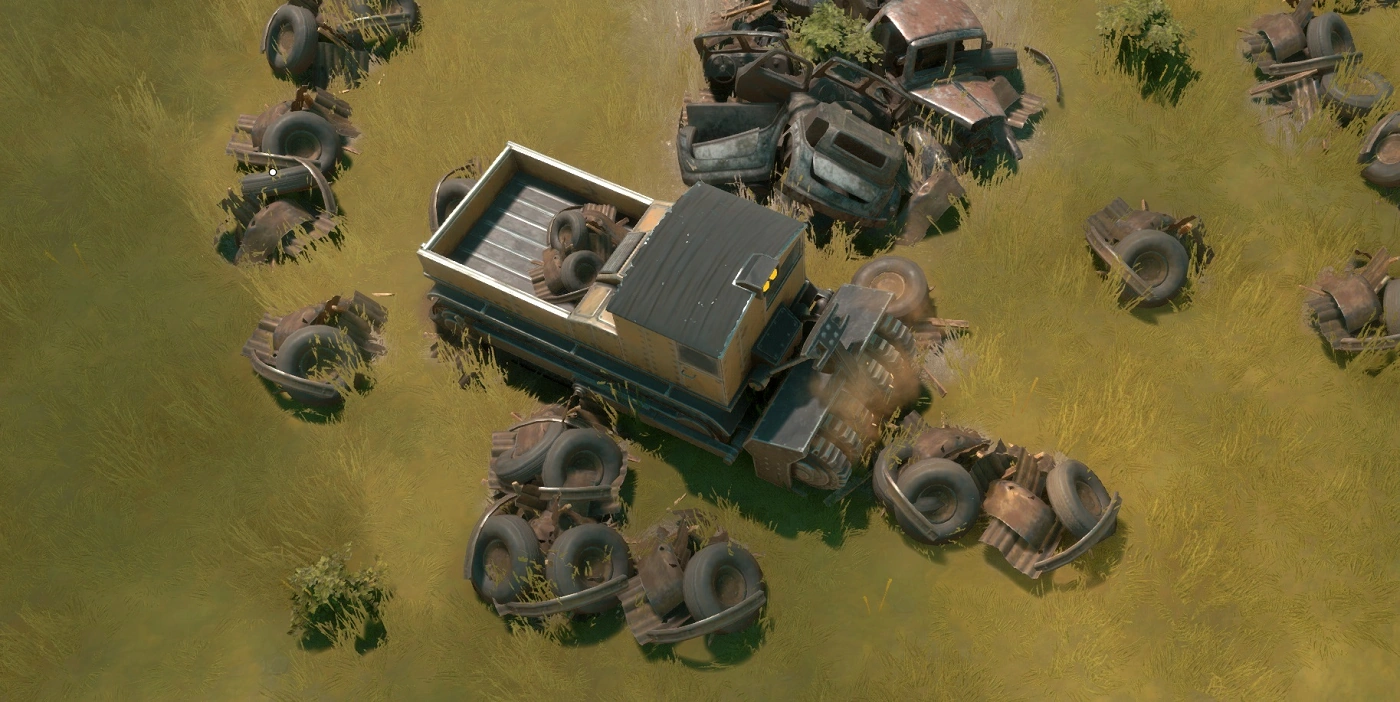
Resources on fields are gathered by hitting (hold Left Click) the small nodes with a Hammer (only works on Salvage), Sledge Hammer, or Harvester. The large center piece can't be mined.
The fields have a hidden reserve of nodes, when a node on the field is harvested, a node from the reserve is spawned in after a few seconds. The amount of nodes left in the field's reserve can be seen by hovering your mouse over a field's icon on the map (only if your faction owns the Region Zone it's in) or by pressing E on a field's large center piece. Once fully depleted, the field replenishes after some time: 1-2 hours for salvage and 4-6 hours for Components and Sulfur but the duration is variable and depends on player population. If the field is not fully depleted, it does not replenish on its own.
Collecting Salvage can occasionally make Iron, Copper, or Aluminum nodes spawn, harvest them as well. These are very valuable, as they spawn rarely and are used to develop new technologies. They must be refined into their respective Alloy at a Refinery. They can then be spent at the Engineering Center to create Prototype kits of technologies not unlocked yet which advances said technology's progress.
Rarely a Field spawns a High Yield resource node. They are identified by a bright light on top of them and yield a much higher amount of resources for the same mining effort.
Resource Transport
There are multiple ways to transport the collected resource to the refinery.
Using a normal truck is the simplest method, transporting 1500 resource per travel. This can be more efficient by using a specialized truck that can only transport raw resources (R-5 "Atlas" Hauler or Dunne Loadlugger 3c) but higher amounts (2000).
However for any field that isn't extremely close to a refinery it's always more efficient to use a Flatbed Truck with a Resource Container on its back (5000 resources). This requires a Crane to be brought to the field to lift the container and place it next to the field but is always worth it. The resource container is emptied at a Refinery using the building's Stationary Crane and the loading area.
For fields close to a beach or coastline it's possible to use a Freighter loaded with 5 Resource Containers, transporting a whopping 25000 resources per trip. However not only will you need a crane at the field but also probably at the coastline to be able to access the freighter's cargo hold. You'll also need to bring the ship to a coastline near a refinery, if you're lucky to have one, to unload the ship with a crane and drive it to the refinery and back. Or more likely you'll have to dock your freighter at a Seaport and use a Flatbed Truck to do round trips between the seaport and the refinery.
It's possible to use a Barge with a Resource Container and bring it to the seaport but it's always less efficient than a Freighter.
Field Setup
To make the collection of resource more efficient it's recommended to set up the fields. Every field should have a crane driven there, it should be parked in a proper position to handle Resource Containers and its fuel siphoned so enemy partisans can't drive it away into the sea. The field should have a Forward Base or better a Bunker Base built close by to activate the AI of the defenses that will be built around the field but also to store excess resources collected and emergency equipment (rifles, ammo, wrenches, bmats). Once Harvesters are available, a Fuel Tanker with 200 cans of Diesel should be brought and placed like the crane so harvesters can easily refuel. If the field is well defended public harvesters can be left on the field for public use as the vehicle isn't very efficient at transporting resources and very expensive.
Resource Mines [ | ]
Resource Mines are an alternate way to acquire raw resources. They are structures semi-randomly placed by the game at the beginning of every War. They consume fuel and output a type of raw resource based on the mine's type. It works at "Low Efficiency" when fueled with Diesel and at "High Efficiency" with Petrol, meaning a greater amount of resources are mined per cycle. If both fuel types are in the resource mine it uses Petrol first.
You can check how much mined resources and how much fuel are in a particular resource mine by putting your cursor over the mine's icon on the map.
The mines can be refuelled manually with a can of fuel or by pressing the refuel button in the mine's menu if there's a Fuel Tanker close by. It's strongly recommended to leave a full fuel tanker next to each mine to make refueling easier.
The resources can be retrieved from the mine using a truck or on foot. But each mine possesses an invisible loading area, similar to the refinery, where you can deposit a resource container for direct access. This requires a crane be brought to each resource mine.
Oil Wells are a type of mine that produce Crude Oil, it is special because crude oil doesn't fit inside a resource container or specialized resource truck, you will always need to use a normal truck to retrieved the crude oils. It also consume very little fuel so once it's fueled (preferrably with Petrol) you don't need to park a fuel tanker near as the next refuelling will probably be in a week.
Refining [ | ]
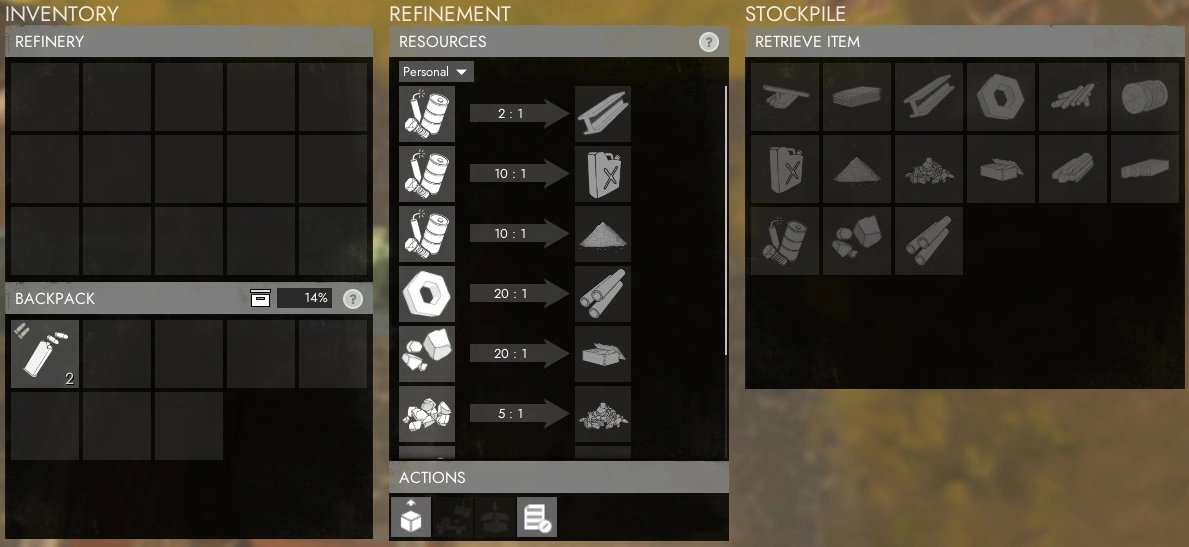
To use the Refinery with a truck, park in the front and without leaving your driver seat press E to open the Refinery's Menu (pictured below).
Refining takes time and the refinery sees high traffic so try not to idle in front of it waiting for your resources to refine.
Resource Container handling
To refine the content of your resource container at the refinery you must lift it using the refinery's crane and place it on the loading area. Doing so automatically opens the refinery menu where you're free to start refining. The container can even be repackaged from the crane with a button at the bottom of the menu so you don't have to exit the crane during the whole operation. To not block traffic or other players from using the refinery it's customary to park your flatbed behind or on the side of the refinery. A second (mobile) crane can be placed next to the refinery for more efficiency, so that if two players bring their resource container at roughly the same time the second player can start lifting their resource container without needing to wait for the first player to place back their emptied container on their flatbed and exit the crane.
Retrieving refined products
You can retrieve the materials in your refining queue with Left Click to get them in stack form, but you can also use right click and select "Retrieve as Crates" to get them in crate form. Retrieving this way is the only way for your materials crates to be reservable into a Reserve Stockpile at a Seaport or Storage Depot. It is also possible to retrieve your materials with a Shipping Container by placing it on the refinery's loading area but you'll need to take them in crate form.
Factory [ | ]

The Factory is a structure that produces crates ![]() of weapons, ammunition, tools, Medical, and base Supplies using materials as input. Items are split into 7 categories at the factory:
of weapons, ammunition, tools, Medical, and base Supplies using materials as input. Items are split into 7 categories at the factory:
- Small Arms
- Heavy Arms
- Heavy Ammunition
- Utility
- Medical
- Resource
- Uniforms .
Only one order of items from a category can be produced at a time. Subsequent orders are queued (up to 6 per category). Orders can contain up to 4 crates and can be set to "personal" (only you can retrieve them once completed), "squad" (only members of your squad can), and "public". Orders listed in the Output window can be filtered by "personal" ![]() , "squad"
, "squad" ![]() , or "public"
, or "public" ![]() type. Completed personal and squad orders become public if they aren't picked up after 60 minutes.
type. Completed personal and squad orders become public if they aren't picked up after 60 minutes.
Items produced in the Factory are packed into crates. Items can not be used until the crate is submitted to a stockpile.
Unlike the Refinery and Mass Production Factory, the factory does not have a loading zone to deposit Shippables like Shipping Containers. This means starting crate production at a factory and retrieving finished orders is exclusively done with a normal truck.
You can check the status of each individual production category queue of a given factory by putting your cursor on that factory's icon on the map (press M).
Construction Yard[ | ]
The Construction Yard is the building where all shippable structures (Containers, Pallets, Emplacements, and Concrete Mixer) are built. To build, you open the building's menu with E and select which structure you want. A blueprint of the selected structure will spawn inside the Construction Yard. You can then build the structure using your hammer if you have the required materials in your inventory. Up to 3 players can be hammering the structure simultaneously.
The building has its own Stationary Crane to lift the shippable structures after they're built. Those shippables will require a flatbed, barge, or freighter to be transported.
If you are thinking about building shippables to deliver to a frontline make sure the frontline region doesn't have a Construction Yard. If it has one it's much more efficient to deliver bmats and rmats to that construction yard and build your shippables there. Also remember that you can produce large shippable crates containing 3 packed shippable structures each at a MPF, so it might be more efficient to produce those instead and transport them to the Seaport or Storage Depot closest to the front for unpacking.
Shipyard / Garage[ | ]
The Garage and Shipyard are the buildings where nearly all land vehicles and ships are built. The building process is identical to the Construction Yard's. The newly built vehicles starts with only a little bit of fuel. It's very common to have a fuel tanker parked next to the building for public refuelling.
If you are thinking about building vehicles to deliver to a frontline make sure the frontline region doesn't have a Garage or Shipyard. If it has one it's much more efficient to deliver bmats and rmats to that construction yard and build your shippables there. Also remember that you can produce large shippable crates containing 3 packed vehicles each at a MPF, so it might be more efficient to produce those crates instead and transport them to the Seaport or Storage Depot closest to the front for unpacking.
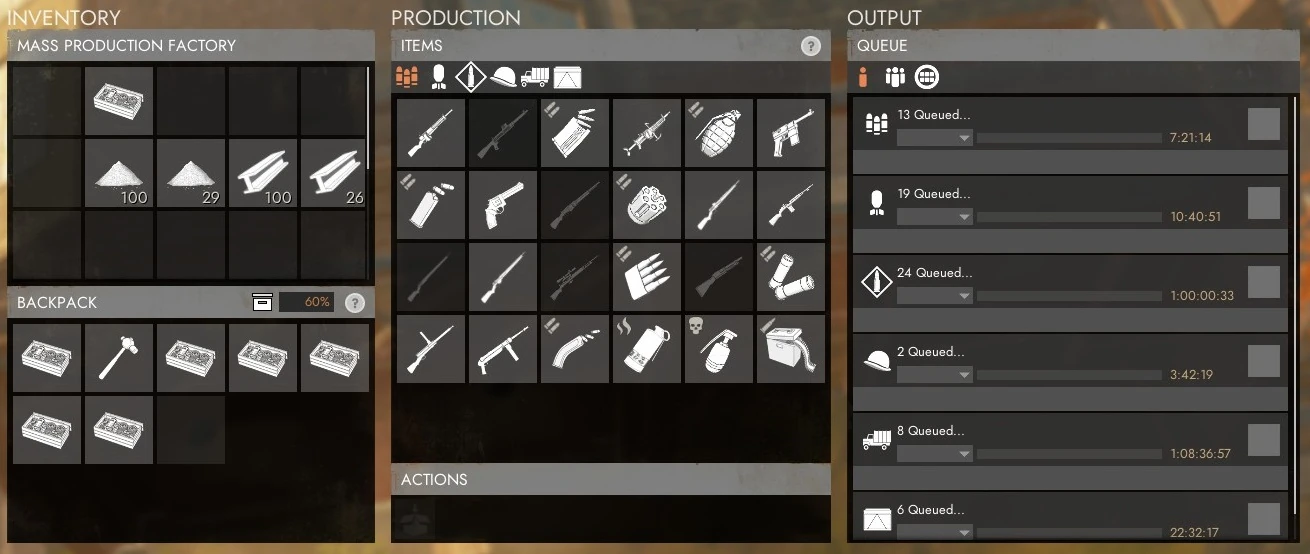
Mass Production Factory (MPF)[ | ]
The MPF can produce crates of small arms ![]() , heavy arms
, heavy arms ![]() , heavy ammunition
, heavy ammunition ![]() , and uniforms
, and uniforms ![]() like a Factory, but also shippable crates of vehicles
like a Factory, but also shippable crates of vehicles ![]() and structures
and structures ![]() (anything that can be made at a Garage, Shipyard, or Construction Yard). By default, each shippable crate contains 3 vehicles/structures.
(anything that can be made at a Garage, Shipyard, or Construction Yard). By default, each shippable crate contains 3 vehicles/structures.
One player can only have one order queued per category (and per MPF) at any given time. An order can only contain a single type of crate. For every crate in the production order, an additional 10% discount is applied up to a maximum of 50%. When ordering Factory items, a minimum of 3 crates are required. Orders can contain up to 9 crates for items and up to 5 for vehicles and structures. They can be set to "personal" (only you can retrieve them once completed), "squad" (only members of your squad can), and "public". Orders listed in the Output window can be filtered by "personal" ![]() , "squad"
, "squad" ![]() , or "public"
, or "public" ![]() type.
type.
The MPF can only process one order from a category at a time. Subsequent orders are queued and each category can only queue up to 25 orders. The production time per crate is longer compared to Factory but more orders in queue shorten the total production time, down to 1.67 times of the original time when there are 25 orders queued (the maximum number of orders a category can have). Completed personal and squad orders become public if they aren't picked up after 48 hours.
Shippable crates of vehicles and structure produced at the MPF are retrieved via the MPF's loading area and will require a Crane or Flatbed Truck to be transported. The vehicles/structures inside can only be retrieved after the shippable crates are submitted to a Storage Depot or Seaport and unpacked there.
The materials required for the orders must be either in the building's inventory, in your inventory or in your vehicle's inventory. It is also possible to start orders with material crates that are inside a Shipping Container or Small Shipping Container placed on the MPF's loading area with a crane but ONLY if those material crates are NOT reservable.
Finished orders of item crates can be retrieved on foot, from the driver seat of a vehicle, or by placing a Small Shipping Container or Shipping Container on the loading area.
Discount
The discount of the items can be seen when preparing but not starting an order, each subsequent item is further discounted; for example queueing 9 items that cost 100 X each would make the cost: 550 = [90+80+70+60+50+50+50+50+50]. 38.8% discount when queueing 9 crates.
Keep in mind when when making vehicles you 1) can only queue 5 at a time, and 2) each order is 3 times the cost of the base vehicle as each crate is 3 of said vehicle. Using the same premise a vehicle costing 100 X each and queueing 5 would cost 1050 = [270+240+210+180+150]. 30% discount when queueing 5 crates.
Tips
The Component and Sulfur resources are scarce and much slower to harvest and refine than Salvage. You should always try to use the Mass Production Factory if you are making items that use Refined or Heavy Explosive Materials, unless the cost of waiting outweighs the benefit of saving materials and refining time. Which can often happen in a war situation.
When considering items that use Basic Materials and none/few Explosive Materials, while the efficiency is not a real issue, there is a comfort issue in the MPF. Private and Squad orders when available, remain in Reserve for 48 hours before going Public, while, at the Factory, it happens at 30 minutes.
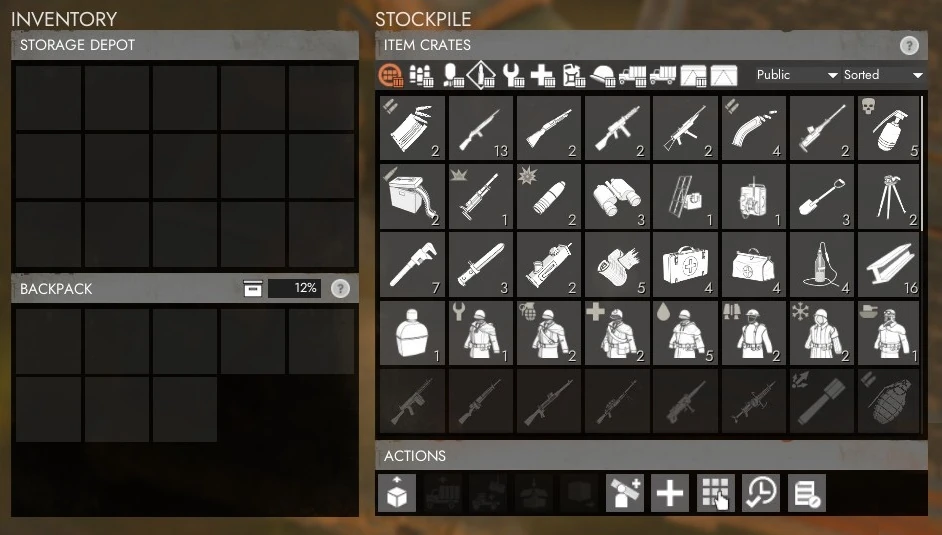
Storage Depot / Seaport [ | ]
The Storage Depot stores item crates and vehicles, it is the only building capable of storing both. It is a good staging area between the back line manufacturers (what we're doing now) and the front line truck drivers who will take supplies from here and ship them to the front line.
Crates can be assembled by clicking on them, this takes a long time however and it's best done whilst in a truck to benefit from the 2x faster assemble time. This building is where you should submit all crates made in the factory unless you plan on delivering them yourself. If you've decided to do the job of keeping the factories pumping out supplies, it's best to keep an eye on this Storage Depot and the Refinery, you do not want to empty out the refinery of its resources nor fill up this depot to its maximum of 100 crates per item.
Private stockpiles can be created there, see Reserve Stockpiles.
Supplying the front[ | ]
What the front ALWAYS needs: Basic Materials, Soldier Supplies, Rifles and SMGs, and their respective ammo. A front cannot be sustained if one of these is missing.
You can check what's in each Base's stockpile by hovering your mouse over their icon on the map.
To supply a front you need a fueled Truck full of crates of goods. It is highly recommended to take a Radio with you and to only drive on roads covered by Watchtowers as it allows you to see on the map whether there are enemies on your road ready to ambush you and steal your shipment.
Retrieve your own crates at the Factory or Take the ones in the public Storage Depot.
Head to the FOB or Town Base close to the front line that you want to supply, park in front of the building, press E to open the base's menu, right click any of the crates in your truck inventory and choose Submit all to stockpile. Then head back home. If your delivery worth more than 600 Basic Materials, players who have set spawn at that base will get a pop up of you delivery for commending you. Do not oversupply a frontline base just to get more commends, because if the base is destroyed and rebuilt by the enemy, they will receive 25% of the items inside.
To be efficient, it's necessary to supply the Seaport or Storage Depot closest to the front using flatbed trucks or freighters with Shipping Containers rather than use simple trucks and do trips from the logistics towns directly to the frontline bases. Delivering many item crates or shippable crates to the public stockpile of Storage Depot or Seaport sends a pop up of you delivery to every allied player in that region.
External links[ | ]
- LogiWaze
- Lesson from 14 Hours of Tanking by [T-3C] "rust developer" DPErny, on logistics of supplying tanks