This article could contain outdated information that is inaccurate for the current version (1.52) of the game. It was last updated for 0.49.
Wind[ | ]
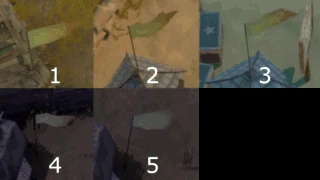
All artillery pieces below have their shells affected by wind. Depending on the strength and direction of the wind your shell will be deviated a certain distance in the wind's direction. This deviation doesn't change with range, it is the same whether you fire 50m or 300m away, unlike the inherent inaccuracy of artillery pieces which will increase with range. The direction and relative strength of the wind can be observed on all flags in the game, such as on the Watch Towers or Pillboxes. The wind can change every couple of minutes, and even more often and more erratically during a Snow Storm.
5 levels of wind strengths can be observed on the flags:
It is the job of the spotter using Binoculars to watch the shells land to adjust the distance and azimuth for the wind.
Mortar (45–80m)[ | ]
Ammo: Mortar Shell, Mortar Shrapnel Shell, Mortar Flare Shell
To use a mortar: crouch, switch shell type with F, reload with R, aim with RMB, adjust distance with Mouse Wheel, and fire with LMB. Use binoculars to watch shells land. Adjust your shots by taking wind into account by checking the flags on foxholes and other garrisoned structures.
Although you can use a mortar all on your own, it's recommended to have a mortar team of 2 or 3 people. One player with binoculars is the spotter, they send coordinates, check for the hit, and send coordinates adjustment for next shell if needed. They also scan for enemy infantry approaching them. Using a microphone is very much recommended for faster coordination. The third player is there to defend the mortar team with a rifle or SMG. Having more than one player allows the team to carry more shells. The group must always try to stay behind the front line for its own safety. Mortar teams almost always use standard shells and prioritize enemy defensive structures like Rifle Pillbox, Anti-Tank Pillbox, bunker garrisons, as well as Bases.
Shrapnel shells are only useful to target high value infantry targets like enemy Mortars, RPGs, or MGs.
Flare shells are only used in small quantities during the night to assist an infantry push.
The mortar tube itself costs 5 Refined Materials so always try to save mortar tubes.
Note: Because the mortar has a specific firing sound and a short range, it is possible for you to hear enemy mortars firing. Since mortars take a few seconds to land you can use the precious seconds to take cover or run away if you suspect the mortar shell is headed for you.
Light Artillery (100-300m)[ | ]
Ammo: 120mm shells
To use a Light Artillery: enter it one of the two seats by pressing Q. When in gunner seat, reload with R, adjust distance with Mouse Wheel, and fire with LMB. When in the "driver" seat, rotate the cannon with A and D (both seats must be manned to be able to rotate). You can spot with binoculars from the little platforms after exiting your seat.
Light Artillery can be placed in a Trench Emplacement for a significant health boost, it is thus very much recommended to put your Light Artilleries in one.
Each shell fired must first be manually carried one by one to the artillery piece. Combined with the inaccuracy of the gun (especially with wind) and the not very high damage, this means any effective use of Light Artillery requires the cooperation of multiple players to unleash a lengthy effective barrage of shells.
Light Artilleries are used to advance pushes, especially when the push encounters a heavily fortified area. With its long range and large AoE, the Light Artillery can clear dense defense networks, especially at choke points like bridges. Note that the 120mm shells used are not very effective against trenches.
The Light Artillery can be used to scare enemy armored vehicles, even if you can't hope to realistically disable or destroy the heavier ones.
Using a Light Artillery works best with one player firing it, one player spotting, and one or more player loading new shells with a truck. Making use of an Ammo Room near the Light Artillery can significantly shorten the loading time.
To use the Light Artillery to its maximum range accurately, the spotter (max binoculars range is 100m, unless on an elevated position) will have to move further ahead than the gun and will have to do a little bit of guess work on the gun's direction and range to the target or they can use a calculator.
Gunboat (50–100m)[ | ]
Ammo: 120mm shells
The gunboat is basically a floating Light Artillery, it uses 120mm shells. Most things that apply to Light Artillery also apply to gunboats.
To use the gunboat cannon: enter the gunboat, switch to the gunner seat, reload with R, aim with RMB, adjust distance with Mouse Wheel, and fire with LMB. Use binoculars while in the commander seat to watch shells land.
The gunboat is a relatively weak ship, at the mercy of enemy APC sticky crews. Speed and coordination is therefore essential to use the gunboat effectively. Make sure to avoid areas guarded by the enemy's deadly Coastal Guns though. A full crew is recommended for the ship (driver, spotter, main gunner, machine gunner).
The gunboat's main targets are densely fortified positions, to assist a land push, and bridges, to prevent enemies from reinforcing a front. The ship can also be used to take out active defenses before a beach landing. Finally, it can destroy enemy Observation Towers in preparation for an invasion or to help friendly partisans not be detected. The gunboat only has 20 shells in its inventory (30 for the warden dual arty gunboat variant), so make each shell count.
Always try to stay 80+ meters away from the coast, as a mortar or RPG crew can kill you with just a few shells.
When you're done using the gunboat, make sure to store it inside the nearest Seaport so that enemy partisans in your back lines cannot steal or destroy it.
Note: You will need to compensate for the elevation if you're trying to hit a target up-hill, so if the range on your binoculars says 75 meters, try to aim at 80 or 85, the compensation here being 5 or 10 meters, depending on the hill's elevation.
Field Artillery (100–250m)[ | ]
Ammo: 120mm shells
To use the Field Artillery: enter the vehicle with Q in the gunner seat, reload with R, adjust distance with Mouse Wheel, and fire with LMB. The vehicle can only be moved when there's both a gunner and a driver. The driver adjusts the angle by rotating the vehicle as the gunner cannot aim.
The Field Artillery is a Light Artillery on wheels. Most advices for the Light Artillery remain true here. Take wind into account and have a dedicated loader, gunner, and spotter.
Communication and coordination will be vital to use a Field Artillery (FA), so voice chat is highly recommended as the game and gun itself are built around teamwork.
The Field Artillery is expensive and pretty fragile and a highly sought target by flanking enemies and road partisans. Make sure it's always safe by equipping a radio and checking radio intel on the roads you'll use to transport the FA. On the front line, make sure it's always well defended by infantry and defenses with active AI. The players using the FA should be equipped with Gas Masks.
After preparing the necessary amount of 120mm shells for your FA, package the FA, use a crane to load it onto a flatbed and drive it to the front, make sure the road and the Base you're going to are clear of enemies. If you'll need additional shells on the front bring new crates of shells by truck and submit them to the front line base or the nearest Ammo Room. Make sure the base has a crane (or a Storage Depot, or a Refinery) to unload the FA from the flatbed, otherwise bring 125 bmats with you and build a crane at the Home Base closest to the front.
After you get to the front lines, your target priority should be dense fortifications such as AT Pillboxes, Garrisoned Houses, or Bunker Garrisons. Artillery is inaccurate and is best use as a barrage of shells on large densely fortified areas. Leave the lonely defenses to the infantry or armored vehicle crews.
To get more accurate coordinates, sit in front of the gun's barrel with binoculars. To hit targets accurately beyond binoculars range (100m) the spotter has to move further ahead than the gun and do a little bit more guess work on the gun's direction and range to the target or use a calculator.
And remember, always try to save the gun, it's worth more than the crew's lives and will cost you dearly if you let it be captured and used by the enemy, if all hope is lost destroy the gun and fall back, sometimes discretion is the better part of Valor.
Note: You will need to compensate for the elevation if you're trying to hit a target up-hill, so if the range on your binoculars says 75 meters, try to aim at 80 or 85, the compensation here being 5 or 10 meters, depending on the hill's elevation.
Heavy Artillery ( 200-350m,
  100-300m)[ | ]
Ammo: 150mm shells
The Heavy Artillery is the big brother of the Light Artillery. It's used roughly in the same way.
Storm Cannon (400–1000m)[ | ]
See Storm Cannon
Bombardment Effect[ | ]
Large artillery bombardments (except mortar) can ruin the landscape and structures over time. Making the destroyed structures unable to be rebuilt and making new structures built on ruined terrain weaker.
See No Man's Land
Tactics[ | ]
Artillery is more effective when used in a barrage rather than firing just a few shells. It serves as area denial, base of fire suppression, and destruction of dense defensive networks (like at a bridge). It is a great opening before a friendly push, or as suppression of an enemy push. The enemy defenses are suppressed, damaged or destroyed. Enemy base of fire (MGs, AT weapons, snipers, mortars, tripod weapons) will be suppressed or killed if they are out in the open or inside weaker structures like pillboxes. Enemy not garrisoned inside defensive structures will be too scared to take positions exposed to artillery fire. Large bunkers can then be slowly destroyed. The only remaining enemy positions not too vulnerable will be trenches, which can be suppressed, fragged and assaulted by your infantry due to the enemy's base of fire being silenced. Once your infantry has taken the enemy's front positions and trenches, your artillery can start firing further and your armored vehicles can start their push.
Artillery can be countered by the use of Emplacements in Trench Emplacements. Emplacements are very sturdy when in a trench and the trench itself take reduced damage from High Explosive damage type. The emplacement gunner can still be hit by lucky artillery hits but not much is lost since the gun and its ammo aren't affected.
The best counter however is always counter-artillery to shut down the enemy artillery. Bunkers with Howitzer Garrisons are a must. Otherwise you'll need to bring your own artillery, spot the enemy artillery piece and target them manually.
External Tools[ | ]
Recommended calculators: